Quickstart for Demo-Kits DK STM32 SOM MP157 (rev00)
 This quickstart will guide you thru the first steps with your brand new Demo-Kit!
Kit identification
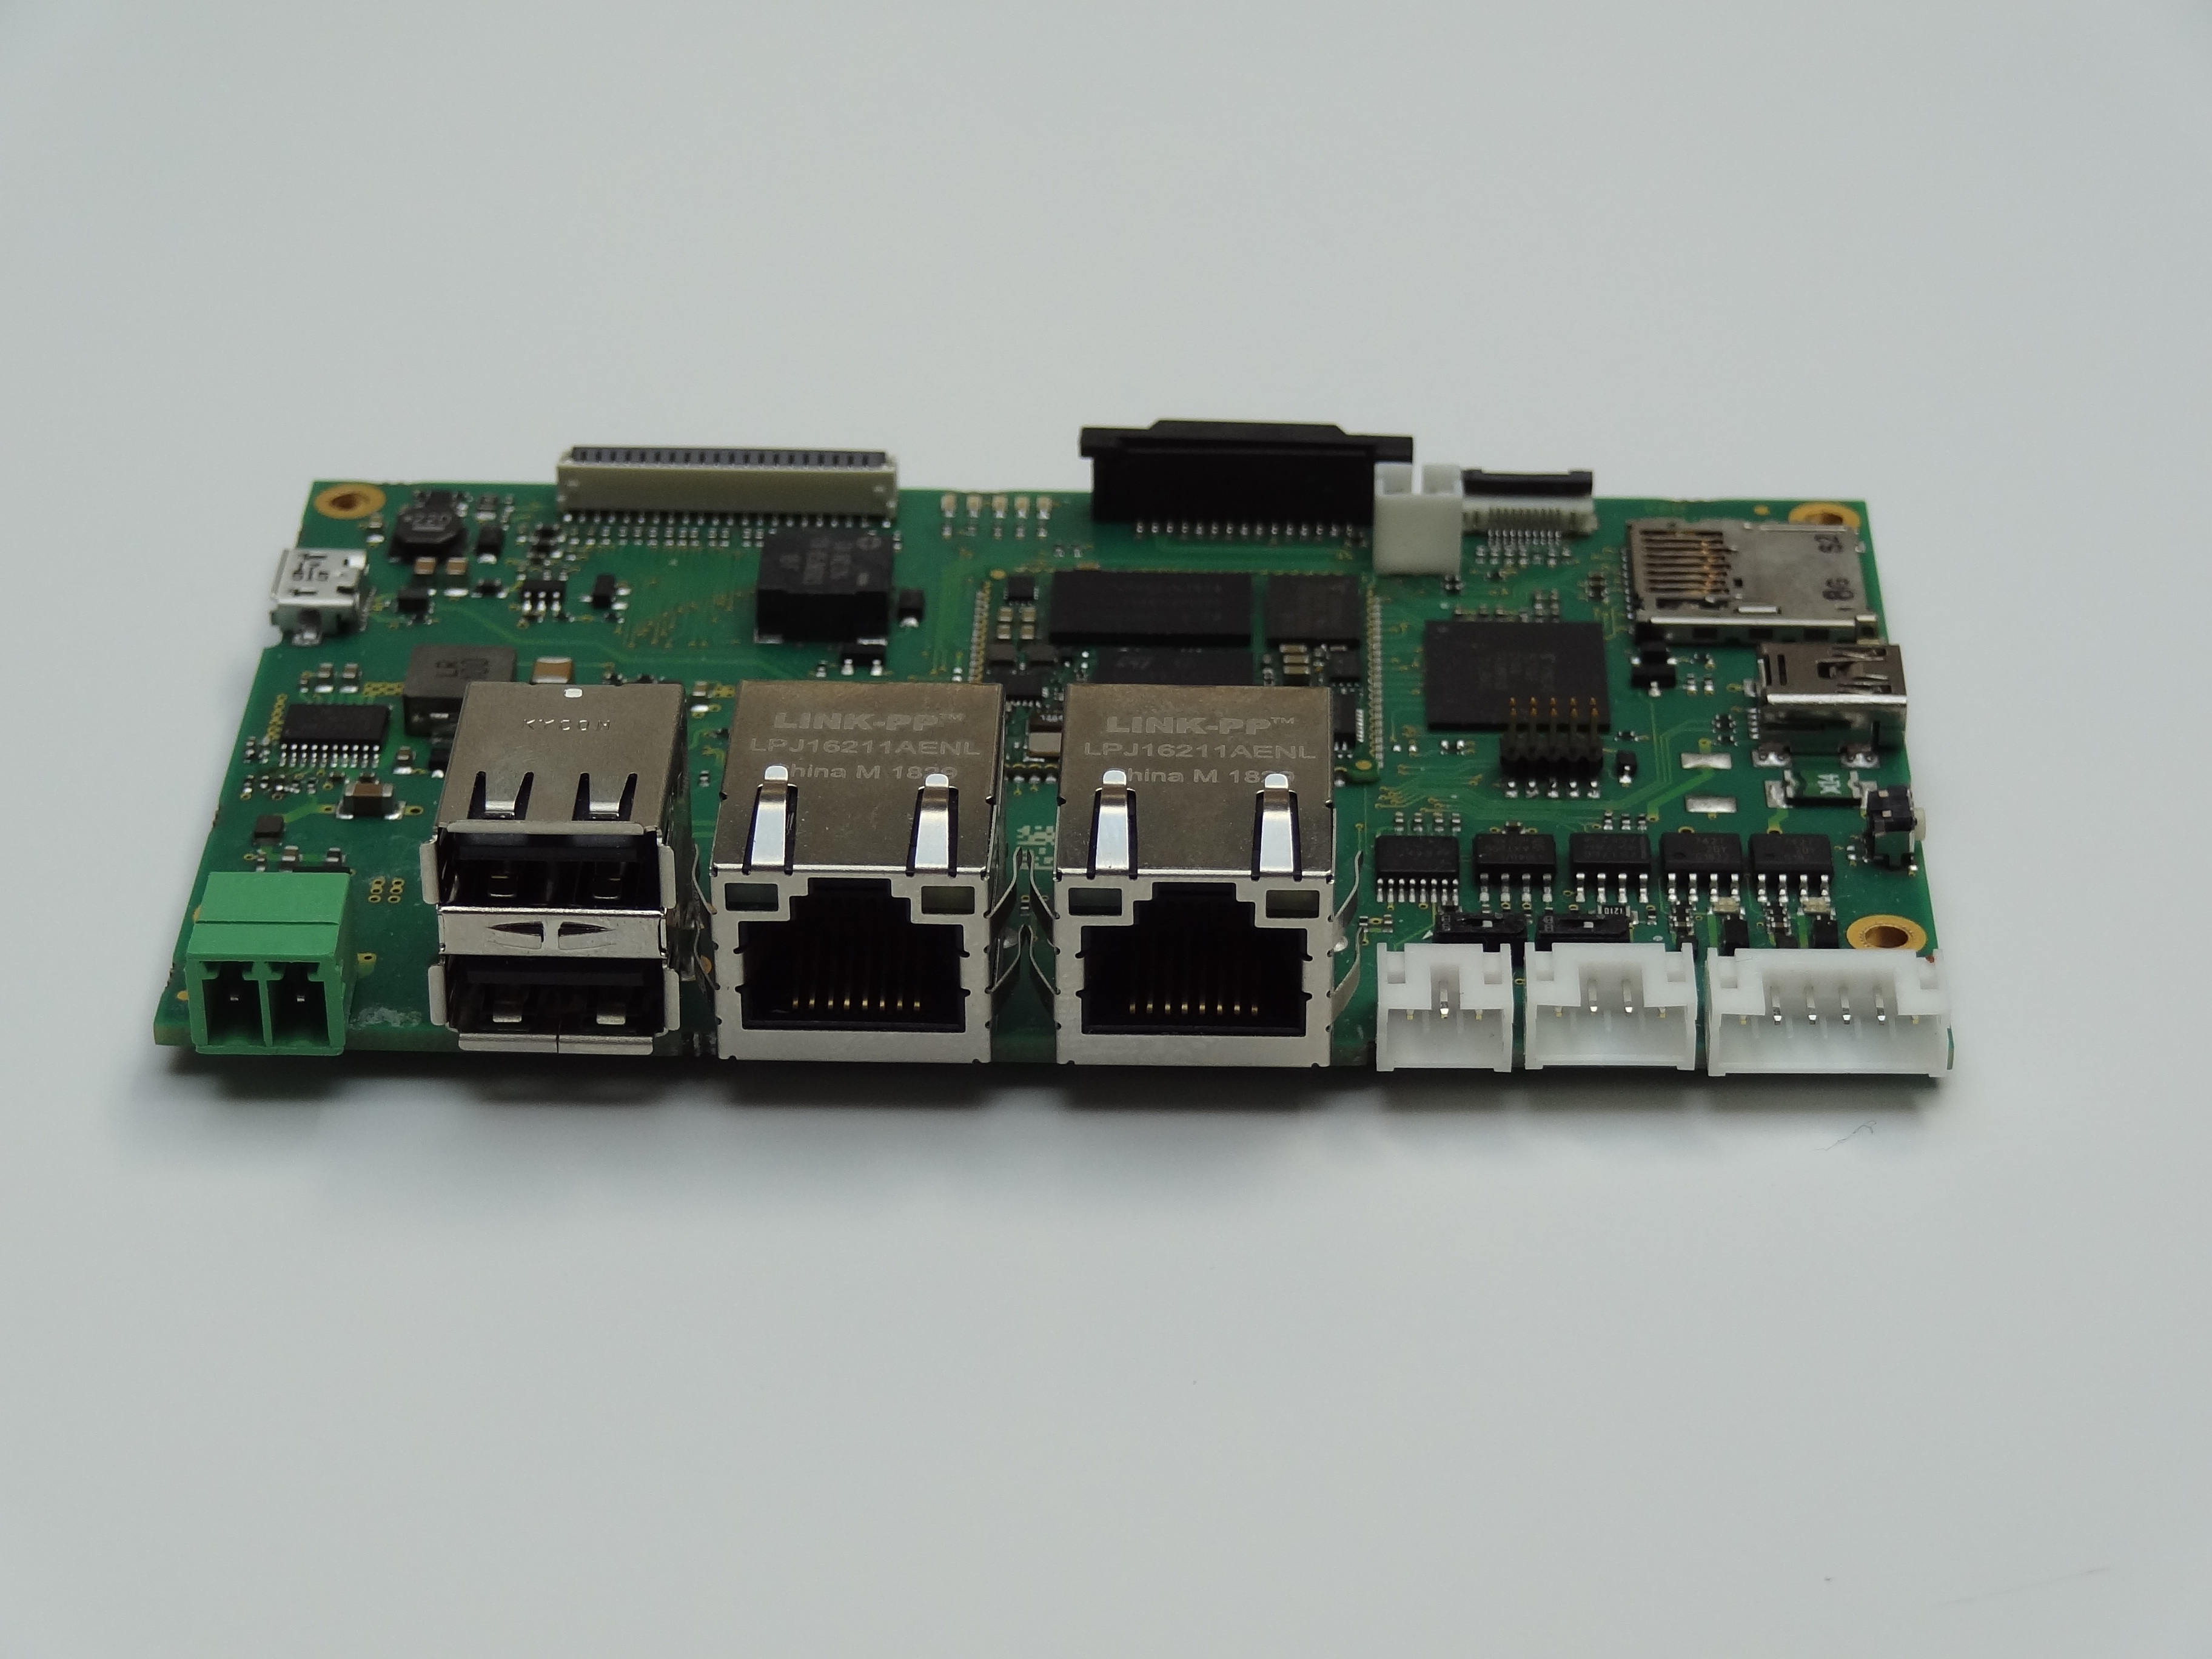 Demo-Kit DK STM32 SOM MP157 (50099045 rev00) without display
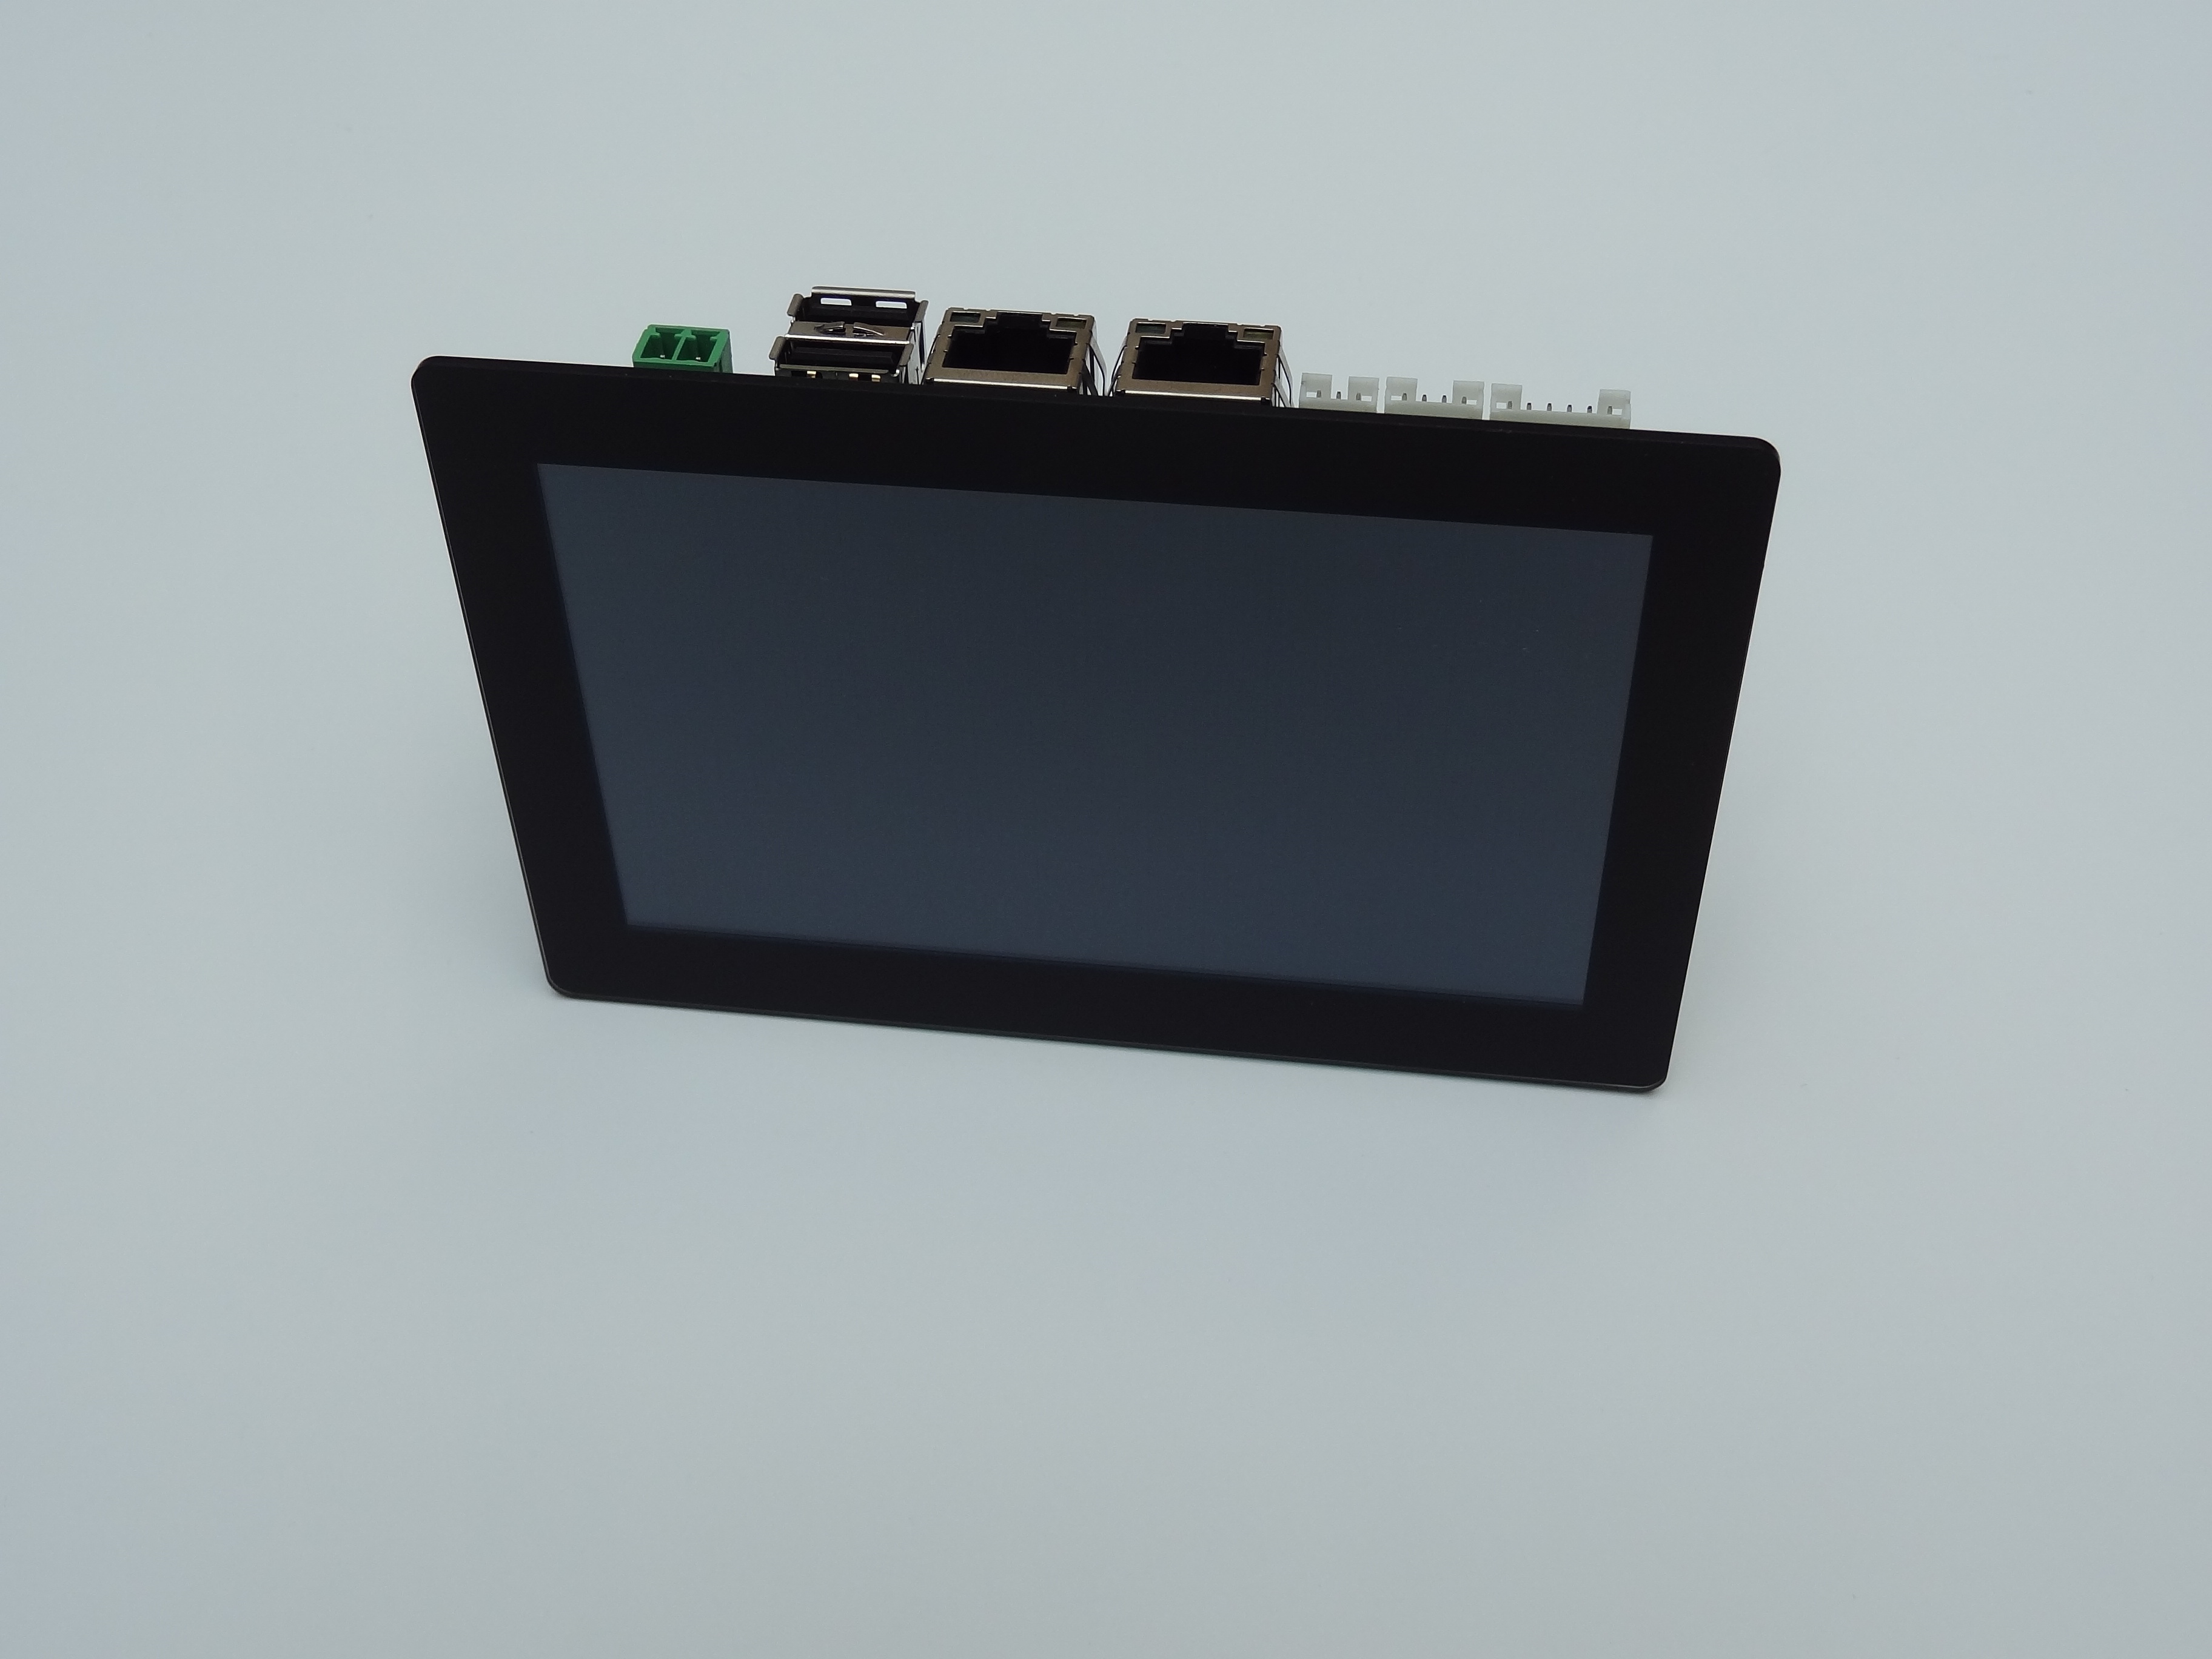 Demo-Kit DK STM32 SOM MP157 (50099044 rev00) with 5 inch display and capacitive multitouch. The baseboard
is mounted on the backside of the display.
Demo-Kit DK STM32 SOM MP157 (50099044 rev00) with 5 inch display and capacitive multitouch. The baseboard
is mounted on the backside of the display.
What contains the Demo-Kit
The Demo-Kit contains all components to start quickly with this board.
- 24V power supply with appropriate power plug

- USB to serial converter for linux console access

- Connectors with cable for 3-pin RS232 rifle, 4-pin RS485/CAN and 6-pin DIO and AIN rifle.
- Mini-USB-B to USB-A cable for connection of USB to serial converter and the debug console connector of the board
These things are not contained in the Demo-Kit, but recommended for further steps
- PC with serial terminal program
- RJ45 ethernet cable
- Network infrastructure with dhcp server
Later, for a full-featured developemt environment this is recommended
- VmWare player or workstation for linux based development installed on a powerful host
- Kontron VmWare image already prepared with all required tools
- ST-Link/V2 debugger with Olimex LTD ARM-JTAG-20-10 connector for M4 development
Prepare, connect and boot
-
Prepare your PC: Installation of Tera Term
If you don't already have a serial terminal program, it is recommended to install TeraTerm on your PC to get access to the linux serial console of your device. If you already have one other program you can use it instead of Tera Term.
To install Tera Term download the newest release from its download page https://osdn.net/projects/ttssh2/releases and install it on your PC. -
Connect serial terminal
First plug in the USB serial converter and open Tera Term. Make a new connection on the serial device with baudrate 115200, 8 bits and no parity. Plug in the Mini-USB-B to USB-A cable into the serial converter and into the serial console interface (don't be confused, it's a Mini-USB socket) -
Connect network interface
If available connect the first ethernet interface to your network with the RJ45 ethernet cable. If your network provides a dhcp server the Demo-Kit should get an ip address. -
Connect power supply
Now connect the power supply and observe the boot messages on Tera Term. After switching on power the green 3.3V and 5V leds will light up. After the board has booted into linux LED3 will indicate a heartbeat blink and LED2 is controlled by M4 and blinks with approximately 2Hz. If the board has a display, the Kontron Qt5 Demo application is started.
 Demo-Kit connected for the first start.
First steps
Login on serial console
After the board has booted you are prompted for a login user name
Kontron Electronics Reference Distro 1.3.0 stm32mp-t1000-s-multi /dev/ttySTM0

stm32mp-t1000-s-multi login:
Login as 'root' without password. As you can see the current software version is printed out before the login prompt is requested.
If you want to know the BSP version out of a running system you can retrieve this from the file
/etc/os-release:
root@stm32mp-t1000-s-multi:~# cat /etc/os-release
ID="ktn"
NAME="Kontron Electronics Reference Distro"
VERSION="1.3.0 (thud)"
BUILD_ID="20191030103231"
BUILD_VERSION="eaf450f"
BUILD_HOST="ubuntu"
BUILD_BB_VERSION="1.40.0"
BUILD_GCC_VERSION="8.%"
BUILD_GLIBC_VERSION="2.28%"
Getting ssh access
The Demo-Kit provides a secure shell daemon (OpenSSH) for encrypted remote login via ip network. This can be used to get a shell login almost like the login via serial console, but it is also very handy to transfer files from development host to device or vice versa.
Precondition for this is that you have a Ethernet network where you can connect your Demo-Kit to. On boot the Demo-Kit will ask the dhcp server of your network for configuration settings. If your network provides a dhcp server this is the simplest way to get connected. The only thing you need is to know the ip address of your device. This can be done using the serial console:
root@stm32mp-t1000-s-multi:~# ifconfig eth0
eth0      Link encap:Ethernet  HWaddr 70:82:0E:99:96:52
          inet addr:192.168.1.65  Bcast:192.168.1.255  Mask:255.255.255.0
          UP BROADCAST RUNNING MULTICAST  MTU:1500  Metric:1
          RX packets:18 errors:0 dropped:0 overruns:0 frame:0
          TX packets:24 errors:0 dropped:0 overruns:0 carrier:0
          collisions:0 txqueuelen:1000
          RX bytes:3051 (2.9 KiB)  TX bytes:5804 (5.6 KiB)
          Interrupt:59 Base address:0xa000
In this example, the device got the ip address 192.168.1.65. Now you can use for example TeraTerm
to connect to your Demo-Kit via network. Create a new connection, select 'TCP/IP' and put in your
ip address in the server field of the dialog. Check that service 'SSH' is selected an press 'OK'
to start the connection. Enter your username 'root' and leave password empty (or put your password
there if you changed it already). Then the connection should be openend in a few seconds.
If your network doesn't provide a dhcp server you have to configure the network settings by hand. Therefore open the serial console and configure the network with the settings appropriate to your network (ask your administrator if unsure).
Here we do a configuration of the interface with ip adddress 192.168.1.70 on a class C network
with network mask 255.255.255.0:
root@stm32mp-t1000-s-multi:~# ifconfig eth0 192.168.1.70 netmask 255.255.255.0 up
Afterwards your Demo-Kit should be accessible under this ip address (provided, of course, that your computer has access to the same network and has the same network mask). Keep in mind that this configuration will be lost, wenn the device is rebooted!
With your ssh shell you can now explore the contents of the device a little bit and e.g. change some configurations. For example you can make your ip configuration reboot save by editing the file '/etc/network/interfaces' with the nano editor.
Controlling M4 led
When the Demo-Kit starts a simple program is loaded into the M4 microcontroller by linux and started. This leads to LED2 blinking.
On the command line you can send commands to the M4 microcontroller which influences the led state:
root@stm32mp-t1000-s-multi:~# rpmsg0 "led status"
led state:BLINKING
root@stm32mp-t1000-s-multi:~# rpmsg0 "led off"
switch led off
root@stm32mp-t1000-s-multi:~# rpmsg0 "led on"
switch led on
root@stm32mp-t1000-s-multi:~# rpmsg0 "led blink"
switch led to blinking
Next steps
-
Install VmWare and download Kontron VmWare image
In the next step you should download Kontron VmWare image to get a ready to run developent environment with all the tools you need preinstalled:
Yocto, SDK, development tools, Kontron tools, STMicroelectronics tools -
Read the Demo-Kit documentation
to get more information about your board- available boot media
- available connectors and interfaces
-
Read the BSP documentation
- to update your board
- to develop for M4
- to use yocto for tweaking your own image
License information
This Demo-Kit contains open-source software which grants you the rights to use, copy, modify and distribute the software. For more information which open-source componets and licenses are included, how to get the sources for this product and how to build them see the Demo-Kit and BSP documentation (https://docs.kontron-electronics.de/stm32mp/build-stm32mp) for this product.